
How to Read a Truss Design Drawing: A Guide for Builder

Learn step-by-step how to read wood truss design drawings for roof trusses and floor trusses. Rigid Component Systems, Colorado’s prefab truss manufacturer, walks you through every callout so you can build smarter, faster, and safer.
Understanding a truss design drawing is essential for any builder working with a roof truss supplier or floor truss supplier—especially here in Colorado, where snow loads, seasonal temperature swings, and site accessibility demand precision.
In this guide, we’ll walk you through:
Core drawing callouts—from overall dimensions to plate sizes
Key design loading and load case considerations
Colorado-specific trends and best practices
By the end, you’ll read any truss drawing with confidence, avoid costly field modifications, and partner more effectively with your truss manufacturer.
Core Components of a Truss Design Drawing

A typical truss design drawing uses lettered callouts to convey every dimension, material, and load specification. Here’s what you’ll find on most truss design and engineering sheets:

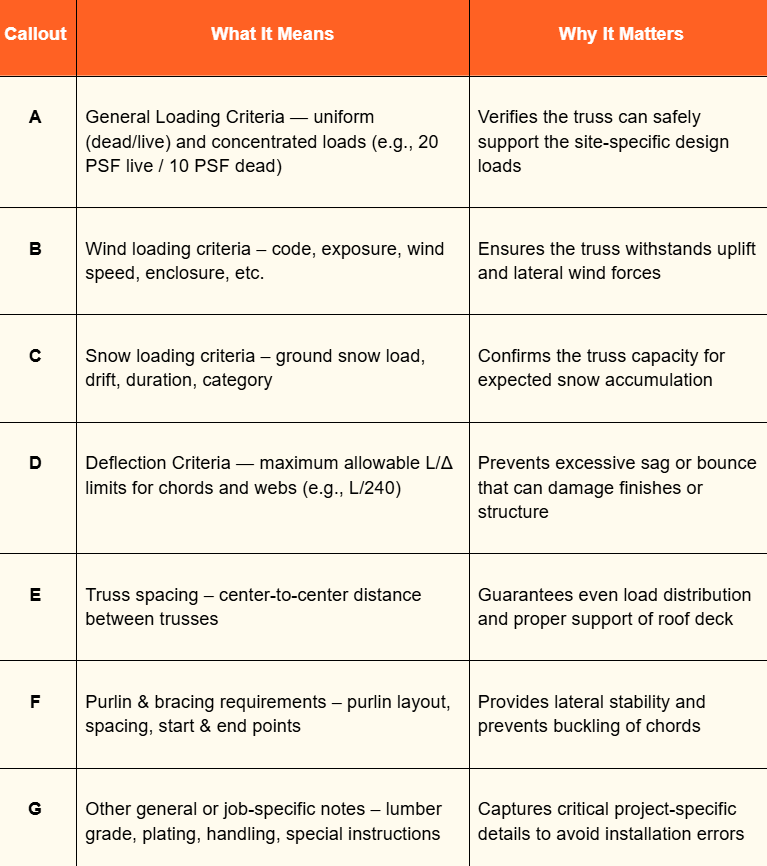

Each callout will reference a key on the drawing’s border or a legend page. Before ordering from your Colorado truss manufacturer, verify that:
Dimensions align with your framed opening sizes.
Plate specs match local code (especially for high-snow zones).
Loading data uses the correct snow, wind, and live-load values for your county.
Reading Load Cases & Design Loading
Truss drawings often show multiple load cases under a callout like “X – Additional Load/Load Cases.” (see this SBCA article). Typical scenarios include:
Dead + Live Loads (service loads for gravity and occupancy)
Snow Loads (per ASCE 7 for your jurisdiction - look up here)
Wind Loads (uplift and lateral pressures)
Tips for builders:
Cross-check PSF values against your site’s snow and wind maps. If your snow load exceeds what’s on the drawing, request a revision.
Understand ASD vs. LRFD: Make sure the drawing’s design methodology matches your engineer’s software entries. Mismatches can lead to over- or under-designed trusses.
Plan for Load Combinations: Some drawings show factored loads (e.g., 1.2 Dead + 1.6 Live). Know which case applies during framing inspection.
Our Perspective: Building in Colorado with Rigid Component Systems
As Colorado’s oldest independent wood trusses manufacturer—and a proud SBCA member partnered with Timber Products Incorporated for rigorous quality audits—we’ve seen firsthand how the Rockies shape construction practices:
Heavy snow zones: In Colorado’s mountain communities, builders frequently run into up to 100 PSF+ snow loads.
Rapid builds: A shorter construction season means off-site prefabrication isn’t a bonus—it’s a necessity. This is why we offer a variety of prefabricated solutions, including roof trusses, floor trusses, and wall panels.
Remote sites: Mountain cabins and ranch outbuildings often have limited crane access. Our truss designs can include pre-assembled gable ends and simplified connection details to streamline installation.
Common Pitfalls & Best Practices
Even with a clear drawing, mistakes happen. Here’s how to avoid the most frequent errors:
Ignoring Reaction Points:
Pitfall: Installing a truss outside its bearing zone.
Best Practice: Confirm “R” callouts and mark bearing locations on your plate line before framing.
Overlooking Plate Orientation:
Pitfall: Reversing connector plates on high-stress chords.
Best Practice: Ensure trusses are set in the correct orientation based on the drawings.
Mismatching Loads:
Pitfall: Using standard trusses when project specs demand higher snow loads.
Best Practice: Always verify PSF values under callout “I” against your permit drawings.
Skipping Shop Drawings Review:
Pitfall: Failing to catch dimensional errors until trusses arrive on site.
Best Practice: Allocate time for a thorough pre-construction review, marking up any changes directly on the shop drawings. We require this on every project.
Conclusion & Next Steps
Reading a truss design drawing is more than rote interpretation—it’s a critical skill that links engineering precision with on-site craftsmanship. At Rigid Component Systems, we’re here to support Colorado builders with:
Durable, custom trusses engineered for local conditions
On-time delivery from our Colorado shop
Exceptional customer service and hands-on installation guidance
Ready to streamline your next project? Contact us today for a personalized quote on roof trusses, floor trusses, or complete prefab wall panels. Build smarter, build faster, and build stronger—right here in Colorado.